Travel by Any Means Necessary

Tag: camping Page 4 of 5

Camping and Hiking Hocking Hills

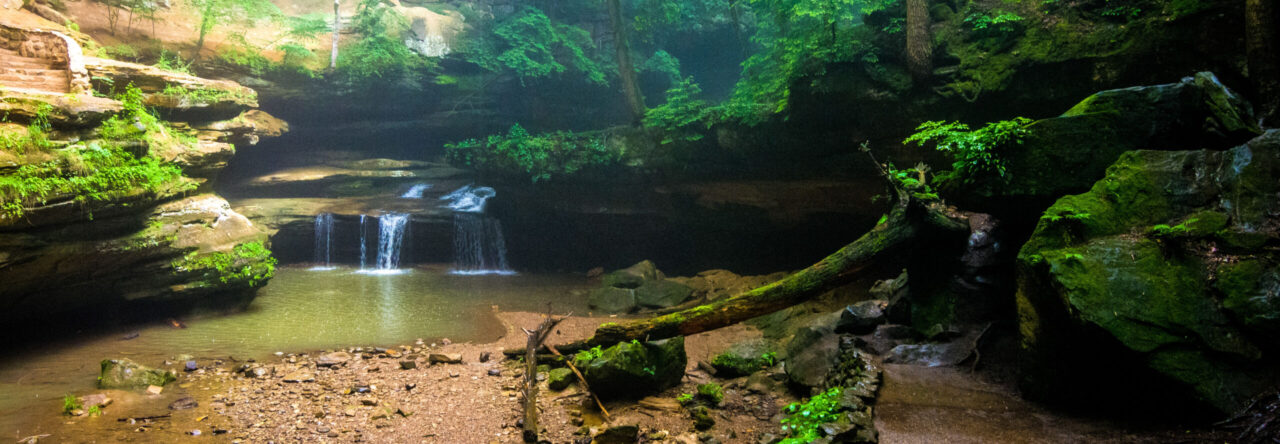
Cave Waterfall

Hocking Hills State Park is a geological gem in southeast Ohio. As someone who has spent a fair amount of time in Ohio over the years, this area does not feel like Ohio. It felt like a cross between the Pictured Rocks area in the Upper Peninsula and Natural Bridge in Kentucky. Paths and hiking trails weave through sandstone rock formations and around waterfalls to stunning, sometimes otherworldly, vistas. The park is full of towering sandstone cliffs, caves, and amazing waterfalls.

There is an experience at Hocking Hills for all abilities and interests from a leisurely stroll to a more rigorous hike. The trails to Ash Cave, Cedar Falls, and Conkle’s Hollow are easy, paved, and have rewarding views at the end. Old Man’s Cave (featured above) is a little more difficult with some beautiful bridges to cross and carved sandstone steps. We hiked Old Man’s Cave during a drizzle and it felt all encompassing and surreal. Rock House was the most challenging hike we did. It involved climbing narrow, boulder-like steps to an amazing cave-like rock formation that once was a hideaway for bandits. If you are even more adventurous, Cantwell Cliffs and The Hemlock Bridge Trail are more longer, more challenging trails with many steps leading to unique locations in the park. If you are looking to make a full day out of hiking, the Grandma Gatewood Trail connects a lot of the sites so you don’t even need a car to see them all.

During our time in Hocking Hills, we stayed in the Old Man’s Cave Family Campground Hike-in Sites. The hike-in sites are outside of the main campground at the mountain bike trailhead. The sites are fairly well spread out and most of them have a good deal of privacy. The four sites closest to the parking lot are first come first serve and the farthest site back is a good .8 mile walk from the parking lot with many sites in between. The path to the hike-in sites is gravel and a wagon is an easy way to transport your gear to your site. Even though the hike-in sites are separate from the main campground, hke-in campers are given main campground privileges such as use of the shower house and pool. I would definitely recommend the hike-in sites to tent campers that don’t require an electrical hookup because the sites at the main campground are very close together and lack privacy.

Read more in my Hiking Hocking Hills Series: Ash Cave, Cedar Falls, Conkle’s Hollow, Rock House and Old Man’s Cave (coming soon). For more information about the Hocking Hills Area visit HockingHills,com. Thanks for stopping by! If you like my photos be sure to “like” my Facebook Page, follow me on Instagram, and Flickr! You can purchase prints on Etsy and Fine Art America. To see inside my camera bag, check out my Gear Page. For information about our new Guided Photography Tours, visit GuidedPhoto.com.

Pin This!

Early Season Camping

Spring is in the Air

Trees at Crosswinds Marsh

This past weekend, we made our inaugural camping trip of the season. The weather was beautiful and I just had the itch to get out and sleep under the stars. We drove to Holly Recreation Area just in time to set up camp in daylight and have a campfire. One of the nice things about camping near home is the reduced travel time gives you more time in camp. Since we don’t typically camp just to camp but to explore, we don’t usually stay overnight at our local parks. This was my first time at Holly Recreation Area and it was very quiet this early in the season. I look forward to returning in the future, maybe for another low key camping trip. Who knows?

If you are ever doing a spur of the moment camping trip like this, I have a few little tips for you. I would recommend checking availability online before you leave. We were planning on going to Highland Recreation Area but after looking on the website, we discovered that to camp there in April and May you have to bring a horse. I was very glad I checked this before we left and we didn’t drive all the way out there before learning that. And of course, you could get all the way out to a campground only to find out that they are full and that wouldn’t be good either. So, I suggest that you check the website before you leave, but do not book a last minute trip online. Most campground reservation systems charge you a processing fee, but if you book at the campground they do not. By booking at the park, we saved some money and it didn’t take any additional time to check in.

Just for clarification, the above photo is from Crosswinds Marsh not Holly Recreation Area. We weren’t really at the park long enough to explore and take pictures. Maybe we will come back another time to capture it and share it here.

If you like my photos be sure to “like” my Facebook Page, follow me on Instagram, and Flickr! You can purchase prints on Etsy and Fine Art America. To see inside my camera bag, check out my Gear Page. For information about our new Guided Photography Tours, visit GuidedPhoto.com.

Spring is in the Air!

Big Pink Flower

I think it may finally be spring here in Michigan, although there is snow in the 10 day forecast, but I’m just going to pretend I don’t see that and hope it goes away. The longer days and warmer weather mean its time to start planning our summer trips! So far, I have a cruise on the calendar towards the end of summer. In July, I’ve booked a weekend camping trip at Straits State Park in St. Ignace. I am so excited to sit around the campfire under the lights of the Mackinac Bridge again!

We are also talking about heading down to the Hocking Hills in June. I have seen beautiful photos of the scenery there and I would really like to capture it! The park in southern Ohio is full of stunning waterfalls, unique rock formations, and miles of hiking trails.

The final trip of the summer that I am planning is a camping trip in the Porcupine Mountains in the western Upper Peninsula. I have heard so much about the area but the seven hour plus drive is a real deterrent. I am hoping this summer to finally overcome that obstacle and experience Lake of the Clouds and Bond Falls myself.

Where are you planning to visit this summer? Let me know in the comments! If you like my photos be sure to “like” my Facebook Page, follow me on Instagram, and Flickr! To see inside my camera bag, check out my Gear Page. For information about our new Guided Photography Tours, visit GuidedPhoto.com.

Mackinaw City

Old Mackinac Point

For Labor Day this year we camped at Wilderness State Park near Mackinaw City. There is a lot to see and do in that area and I was excited to spend a long weekend exploring it! We stayed for three nights and I realized that with two summer road trips, three nights was the longest we had stayed in one place on a trip since our cruise in 2015. That is, if you count a cruise as staying in one place. If not, you would have to go back to our Disney World trip in 2014. Obviously, we prefer to move when we travel.

I really enjoyed our stay at Wilderness State Park. We stayed in one of the new tent sites that are right on Lake Huron. It was like having our very own beach! We had a great long weekend and Wilderness was quickly added to our list of favorite campgrounds!

The above photo was taken at the Old Mackinac Point Lighthouse. Its a picturesque lighthouse that sits right near the base of the Mackinac Bridge in Michilimackinac State Park. If you are in the area, I recommend that you visit the park and the fort there, but I wouldn’t recommend spending your money visiting the lighthouse, and this is coming from someone who LOVES Michigan lighthouses. The thing that threw me about visiting the lighthouse is that climbing the lighthouse is not guaranteed with admission. Luckily, we got to climb but the way they do tours, it was so crowded at the top, it was hard to take pictures and by the time the whole group got up there, I just wanted to go back down. If you are a lighthouse fan like me, go to Michilimackinac State Park and photograph the lighthouse from outside the fence, and if you want to climb a lighthouse, head two miles out of the city to McGulpin Point Lighthouse, which I will review in a later post! Be sure to check back later so you don’t miss it!

Thanks for stopping by! For more information about Wildnerness State Park visit the DNR. To plan your trip to Michilimackinac State Park, visit MackinacParks.com. If you like my photos be sure to “like” my Facebook Page, follow me on Instagram, and Flickr! To see inside my camera bag, check out my Gear Page. For information about our new Guided Photography Tours, visit GuidedPhoto.com.

Pin this!


B&B Trip Report: Frisco Campground

Frisco at Night

After visiting the Wright Brothers Memorial, we made our way to Frisco Campground, our home for the next two nights. This was our favorite campground of the trip, full of dunes and secluded spots. Since it was the middle of the week, there weren’t a lot of other campers, so we chose a spot at the top of a dune with a view.

Deer in the dunes at Frisco Campground

The Cape Hatteras National Seashore has applied to be a international dark sky park which means that it has a  lack of ambient light nearby and is great for stargazing, and in our case, astro-photography. With our D3100s, we’ve never attempted astro photography, but we rented a D7200 for this trip and we had to take advantage of this combination! It was a fun learning experience! The above Milky Way shot was taken at our campsite at Frisco.

To learn more about Cape Hatteras National Seashore, visit the National Park Service. Thanks for stopping by! If you like my photos be sure to “like” my Facebook Page, follow me on Instagram, and Flickr! To see inside my camera bag, check out my Gear Page. For information about our new Guided Photography Tours, visit GuidedPhoto.com.

Pin This!

First Camping Trip of the Season

Big Sable Sunset

This past weekend, we ventured out to our first camping trip of the season. We’ve been wanting to check out the Jack Pine campground at Ludington State Park since we discovered it on our first visit to the park several years ago. What really intrigued us about this campground is that it is a hike-in campground a mile from the Big Sable Point Lighthouse. We were really looking forward to this because it would allow us to stay at the lighthouse later and photograph it during blue hour without worrying about our car getting locked in the day use area parking lot. The light didn’t end up being as phenomenal as we were hoping, but it was nice to spend sunset on Lake Michigan. We absolutely loved our campsite (site F). It was secluded and quiet but also close to the road to the lighthouse. One night wasn’t enough. We will have to make plans to stay at this campground again sometime soon!

If any of you are heading to the Jack Pine campground, one tip to know is that the path to the campground is actually a gravel road used to service the lighthouse. They say everything must be backpacked or biked in, but we brought a foldable wagon and it worked great and held more than a backpack would. While Chris’ arm got tired pulling it, I have to think it was easier than carrying everything on his back.

Thanks for stopping by! If you like my photos be sure to “like” my Facebook Page, follow me on Instagram, and Flickr! To see inside my camera bag, check out my Gear Page.

Pin This!

Epic Michigan Road Trip: Rifle River

Rifle River Pano

Wow! We are at the end of my road trip! I am so sad to be done retelling it, but don’t worry, I have plenty more photos coming! Back to the trip!

After making our way down the Lake Huron coast, we headed inland to the Rifle River Recreation Area. We chose this as our last stop on the trip because it was literally the last campsite available in the northeastern part of the state for the Saturday before the Fourth of July. It was a rustic site, meaning no electricity and outhouses instead of bathrooms. The park was definitely the largest we visited on the trip. We drove for a while before we got to our campsite. And for the outdoor adventurer, there is a lot to do between hiking and canoeing, kayaking, and tubing. If you’re looking to camp and spend time on the water, this would be a great place for you!

About the Photo:
This shot was taken in the morning of the day we were heading home. Before we left the park I wanted to stop at the observation platform and get a photo for the blog. This shot was an 8 RAW exposure panorama stitched together with basic edits in lightroom.

Camera Gear:
Nikon D3100 with 18-55 mm kit lens, handheld

Date Taken:
July 3, 2016

Thanks for stopping by! If you like my photos be sure to “like” my Facebook Page, follow me on Instagram, and Flickr! To see inside my camera bag, check out my Gear Page. To learn more about Rifle River Recreation Area, visit the Michigan DNR.

Pin This!

Epic Michigan Road Trip: Lighthouse Hunting

Clouds at Tawas Point

In Sault Ste. Marie I picked up a Michigan Lighthouse Map which shows every lighthouse in Michigan and whether or not its open to the public. So, when we were making the drive down the Lake Huron coast, we made a point to stop at all the lighthouses we could. We managed to stop at 7 lighthouses on our way down south including three in Presque Isle, two of which we climbed. The above photo is of the Tawas Point Lighthouse.

For our night on Lake Huron we stayed at Hoeft State Park in Rogers City (south of Cheboygan). This park surprised me. We were there the Friday before the Fourth of July and I was expecting it to be kind of rowdy but it wasn’t at all. It seemed to be mostly families, a lot of which had bikes and were making use of Huron Sunrise Trail. The sites were big and wooded, but the bathrooms didn’t live up to Hartwick Pines (this was the theme of the trip). If I was looking to stay near Lake Huron, I come back here in a heartbeat!

About the Photo:
I got incredibly lucky with this picture! There were no Photoshop tricks or external flash used here. We happened to get to the lighthouse when it was sprinkling a little, but a bigger rain was definitely on its way. To the west, the sun was not covered by clouds with made for this awesome cloudy background with evening light on the lighthouse. This was a single RAW exposure with basic edits done in Lightroom.

Camera Gear:
Nikon D3100 with 18-55 kit lens and polarizer, handheld

Date Taken:
July 2, 2016

Thanks for stopping by! If you like my photos be sure to “like” my Facebook Page, follow me on Instagram, and Flickr! To see inside my camera bag, check out my Gear Page. To plan your Lighthouse Exploration Trip, visit MichiganLighthouseGuide.com. To book your stay at Hoeft State Park visit the Michigan DNR.

Pin This!

Chris Corner #12: The Tent Shot with the Mackinac Bridge

Tent at the Mackinac Bridge by Christopher Mowers on 500px.com

From the moment I knew we were going to stay at Straits State Park in St. Ignace, and that we would have a campsite right on the water, I knew that I wanted to take a photo of my illuminated tent with the Mackinac Bridge in the background. This post will walk through the process I took to come out with this image.

Planning:
I took the photo during late blue hour because I wanted a relatively even exposure between the lights on the bridge and the illuminated tent. I considered using my speedlight in the tent, and that may have yielded a better illumination, but in the end I decided to use a few LED flashlights, as I didn’t want to be obnoxious in the campsite with a flashing tent. I walked around the site to get the best composition, and then set up my tripod.

Shooting:
It would be very easy to get all of this (and more) in frame with a lens on the wider end of the spectrum. This was my first instinct; however, my first peek in the viewfinder reminded me of a very real issue: when shooting below approximately 50 mm, background objects appear increasingly smaller as compared to how they are viewed by the human eye. In other words, at 18mm, everything is in frame, but there is a huge tent and a tiny bridge. This is no good.

The solution to this problem is to go telephoto. Above 50mm or so, objects in the background appear larger than they do to the human eye, and the greater the focal length, the closer one will get to a point where background and foreground are nearly identical in perceived size.

The telephoto presents a second issue though, and that is that I could not back up far enough to get everything in frame. We have a technological solution to this though, and a relatively easy one to execute since I was on a tripod. I started on the left and took an exposure, then I panned until I had about 2/3 of the frame as new stuff and I took another exposure. I repeated this process until I had everything covered, with a decent amount on either side in case I had to crop due to my technique not being perfect.

My exposures were at f/11, ISO 400, for 30 seconds.

The Lightroom Editing:
The first step was to stitch everything together, which is easily accomplished in Lightroom. Then I cropped, and made simple exposure and contrast adjustments, as well as some color corrections.

The Photoshop Edit:
This was the time consuming bit of the edit. I’m just going to list everything that I did.

  • Using content aware fill, I removed the branding from the tent
  • Using luminosity masks, I did the following
    • Corrected some exposure issues in the bridge and water
    • Brushed noise reduction into the shadows
  • Using a high pass filter, cloned and emphasized texture in the tent
  • Using the camera raw filter, I added vignette and other minor finishing touches


So that’s how I got the shot. It’s not perfect, but I think it tells a great story and I learned a lot. I am confident that the next time I am in this kind of situation I can come out with something even better.

Date Taken:
June 26, 2016

Thank you for reading. You can see my best work on 500px and can also find pictures of the “trying my hardest to be good at this” type on Flickr or Pixoto.

Also, be sure to like the Go See Do Facebook Page, and follow Ashleigh on Instagram and Flickr! Check out our Gear page to see inside our camera bag!

Epic Michigan Road Trip: Straits State Park

Mackinac Bridge at Sunset

Straits State Park was the first major stop of the trip and it was my favorite campground. The park has three campgrounds the upper campground and two lower campgrounds. The lower campgrounds have a view of the Mackinac Bridge. If you are a tent camper, they have about 6 sites right on the water with a completely unobstructed view of the bridge, but no electricity. These sites do fill up fast, we were only able to be on the water on a Sunday night, so if you’re interested, I recommend booking as close to that 6 month window as possible. If you are not a tent camper, or you can’t do without electricity, there are some spots just on the other side of the road that have a good view and there is a small park, which was right next to our site, where you could set up your tripod. Chris has an awesome shot of our tent lit up at night with the bridge in the distance. That photo will be up on the site on Friday.

Straits State Park also has a bridge viewing area away from the campground if you’re not looking to camp. The park is also home to the Father Marquette Memorial which is on the other side of I-75 and also features a bridge viewing area. The bridge is definitely the biggest attraction at this park.

About the Photo:
This photo was taken during sunset from our tent site on the water. It was a single RAW exposure with basic edits done in Lightroom. I also used a graduated filter in Lightroom to darken the sky.

Camera Gear:
Nikon D3100 with 55-200mm kit lens on a tripod

Date Taken:
June 26, 2016

Thanks for stopping by! If you like my photos be sure to “like” my Facebook Page, follow me on Instagram, and Flickr! To see inside my camera bag, check out my Gear Page. To book your stay at Straits State Park, visit the Michigan DNR.

Pin This!

Page 4 of 5

Powered by WordPress & Theme by Anders Norén